
Stand aside, baking influencers. We’ve got this one.
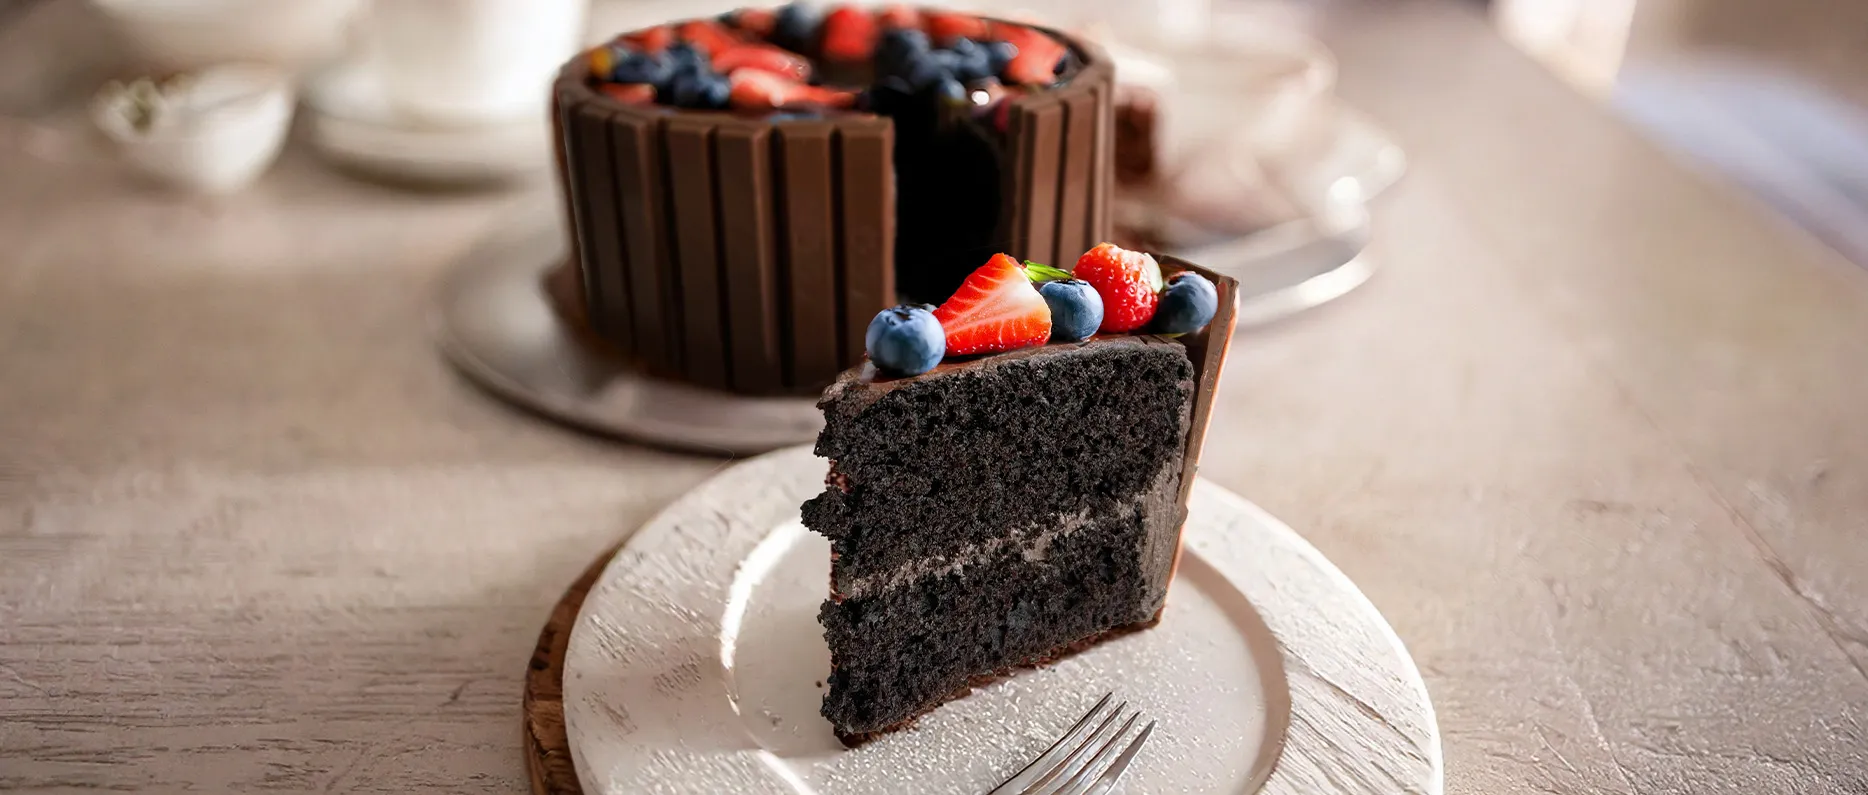
KitKat® fans rejoice! Today is the day that we bake a KitKat® cake that will go down in history among your friends and family. It’s impressive to look at, ridiculously easy to pull off and the best part is, it’s guarded by a delicious fortress of crispy KitKat® fingers. We’ve gone for a classic milk chocolate picket fence, but you can customise it. Choose your favourite KitKat® flavour or get cheeky and use them all to create a KitKat® cake wheel of flavour!
In the mood for something colourful, cute and tasty? Try our Smarties® Mini Vanilla Cupcakes or dive into our Types of Cupcake article and find your favourite flavour. And if all the party planning is getting to you, find your zen moment with our handy 5-Minute Meditation Guide.
For more recipes, inspiration and tips, sign up to our newsletter. Happy baking!
How to Make a KitKat® Cake They'll be Talking About for Years
This cake is a real showstopper and it’s as easy as snapping a KitKat® in two. Let's go!
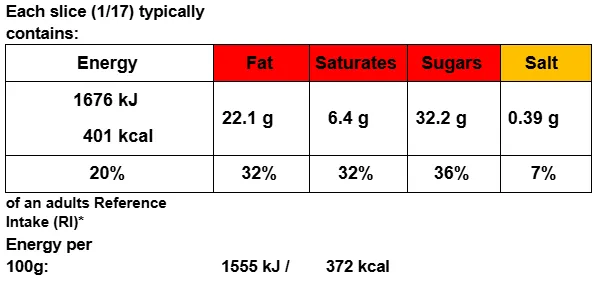
Nutritional Information
KitKat Cake Variations
Mix up your chocolate flavour fence with our range of KitKat® flavours! Go with KitKat® White for a striking contrast, or add a decadent crunch with KitKat® Caramel. Don’t forget KitKat® Orange for a citrus twist, or add a smooth touch with KitKat® Nescafe Mocha.
For a mint-infused chocolate cake, add ¼ tsp peppermint extract to the cake mix and consider using KitKat® Dark for a grown-up taste. Or if like things lighter, simply swap out the cocoa powder for the same quantity of extra self-raising flour to make a vanilla sponge!
KitKat cake toppings
The magic of this cake (besides the ring of crunchy KitKat® fingers) is you get to top it with whatever you like, according to the occasion. We’ve gone with strawberries and blueberries for fruity freshness, colour and contrast, but you could add toasted nuts and coconut flakes for flavour and texture.
You will need
- 2 x 20cm cake tins
- Baking paper
- An electric whisk (optional)
- A palette knife (optional)
- A length or ribbon (optional)
Ingredients
For the cake
- 200ml sunflower oil
- 200ml semi-skimmed milk
- 200g caster sugar
- 3 large eggs, room temperature
- 2 tsp vanilla extract
- 200g self-raising flour, sifted
- 50g cocoa powder, sifted
- ½ tsp bicarbonate of soda
For the chocolate buttercream
- 100g buttery baking spread
- 25g coca powder
- 150g icing sugar
- 1 tbsp hot water
For the decorations
- 34 KitKat® fingers
- 150g fresh strawberries
- 150g fresh blueberries
- Ribbon (optional, for tying around the cake)
Method
For the cake
- Preheat oven to 180°C/160°fan/gas 4. Grease and line two 8-inch round cake pans with baking paper.
- In a large bowl, add the oil, milk, caster sugar, eggs and vanilla and whisk to combine.
- In another bowl, sift in the flour, cocoa powder and bicarbonate of soda. Add the dry ingredients to the wet in two stages, folding gently with a silicone spatula to combine then mix briefly until smooth.
- Divide the mixture evenly between the cake tins.
- Bake for 25-30 minutes, or until a cocktail stick or skewer inserted in the centre comes out clean.
- Cool in the tin for 10 minutes then pop the cakes on a wire rack to cool completely before icing.
For the chocolate buttercream
- Whisk the buttery baking spread in a large bowl until light and fluffy.
- Gradually whisk in the sifted icing sugar and cocoa powder, then add one tablespoon of hot water and beat it until it's super smooth and creamy.
To assemble
- Spread an even layer of buttercream on the top of one cake.
- Stack the second layer and cover the entire cake with an even layer of buttercream.
- Attach KitKat® fingers vertically around the cake, pressing gently into the icing to secure.
- Tie a ribbon around the cake for extra hold (optional).
- Add your choice of topping! See our suggestions above.
Top Tips
- Use 20cm baking tins to get the perfect height to match the KitKat® fingers. If the cake layers come out of the oven raised, level them out with a knife. Having a flat top helps you spread the topping evenly. You can save the shavings in the freezer and use them to make a Smarties® cake pop another day!
- Pop your KitKat® stash in the fridge for an hour before decorating to help prevent any finger smudges, and don’t worry about icing the cake perfectly! The sides and top will be covered, so just make sure it is evenly layered.
- Add even more razzle dazzle to your cake with edible glitter or gold foil.
Questions
How many KitKat® fingers do I need to create the border?
Thirty-four KitKat® fingers will be enough to create an even border.
How do I slice up the KitKat® cake?
Let the KitKat® fingers be your guide! Aim for two per slice, for a total of 17 slices.
How do I store my cake?
Store the cake in an airtight container at room temperature. If the weather is hot, store your cake in the fridge to avoid runny icing.
How long will the cake last?
Stored in an airtight container, your cake will last for up to three days.
Why is my cake dry?
Overbaking can dry out your cake. To check if it is set, the cake should spring back when touched, and a cocktail stick comes out clean when inserted in the centre.
Recirculation widgets
- 1.9 Smarties Mini Vanilla Cupcakes
- 1.4 Types of Cupcakes
- 5-Minute Meditation You Can Do on Your Coffee Break